
Exercitation ullamco laboris nis aliquip sed conseqrure dolorn repreh deris ptate velit ecepteur duis.
Exercitation ullamco laboris nis aliquip sed conseqrure dolorn repreh deris ptate velit ecepteur duis.
 Blog
BlogA tutorial in PFCG role building
In our previous blog posts, we have talked about SAP authorisations and the principles of role building.
You may remember that in order to perform a task in SAP, a user needs to have a set of authorisation objects which:
· Allows them to execute the relevant transaction code (t-code), and
· Provides authorisation to complete the transaction.
This collection of authorisation objects is called a profile. Authorisation objects cannot be directly assigned to users and instead are collected within a container. Roles act as such containers.
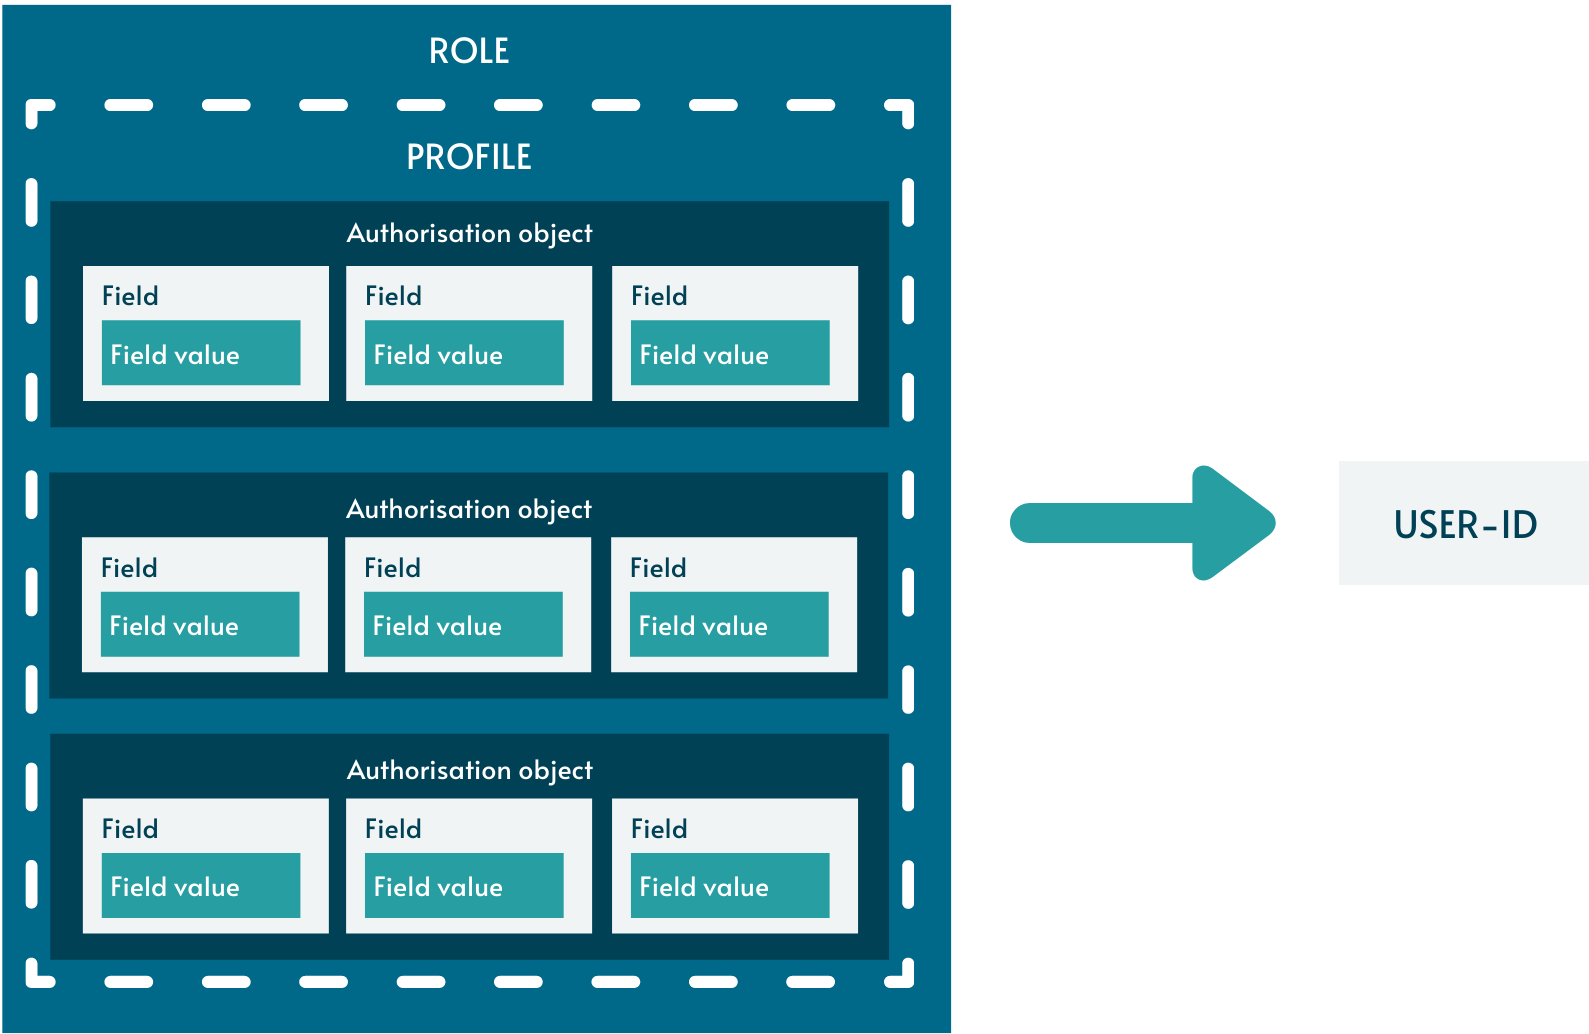
The Profile Generator (PFCG) is used for role-building in SAP. Automatic PFCG functionality helps ensure that all authorisation objects are defined within a role, so that the role itself carries sufficient authorisation to allow the relevant task to be performed in SAP.
At a high-level, this describes the basic steps of creating a role in PFCG:
Once the profile has been generated, the role can be assigned to users or HR positions (only applicable where SAP HR is used).
Building a single role in PFCG
Let’s build a role which allows the creation of purchase orders (POs) in PFCG. The role should have these authorisation objects and values.
These are the types of activity allowed in this role:
Steps
1. Create role. In this case, enter the role name ‘PO_CLERK’ and create a single role.

2. Enter the transaction code. A menu for this role will appear automatically. The menu is what the role will give access to as viewed on the SAP GUI.

3. Authorisations can be generated manually or automatically. In this case, we want to utilise the available functionality on Profile Generator to select the relevant authorisation objects. Expert Mode for Profile Generation should be selected. Notice how despite having a t-code assigned to this role, no authorisations or profile have been assigned.

4. For the relevant authorisation objects, relevant organisation units have to be specified. Authorisation field values will be added according to these entries.

5. This screen (which is still part of PFCG) shows the authorisations which have been assigned to the role PO_CLERK. As you can see:

6. Specifying the document type for authorisation object M_BEST_BSA turns the traffic light to green.

7. Once there is no more missing authorisation field values, the profile for this role can be generated. The profile contains all the authorisation objects shown on this screen.

8. User IDs can now be assigned to this role. A user comparison needs to be performed in order to update the profiles associated with these user IDs.
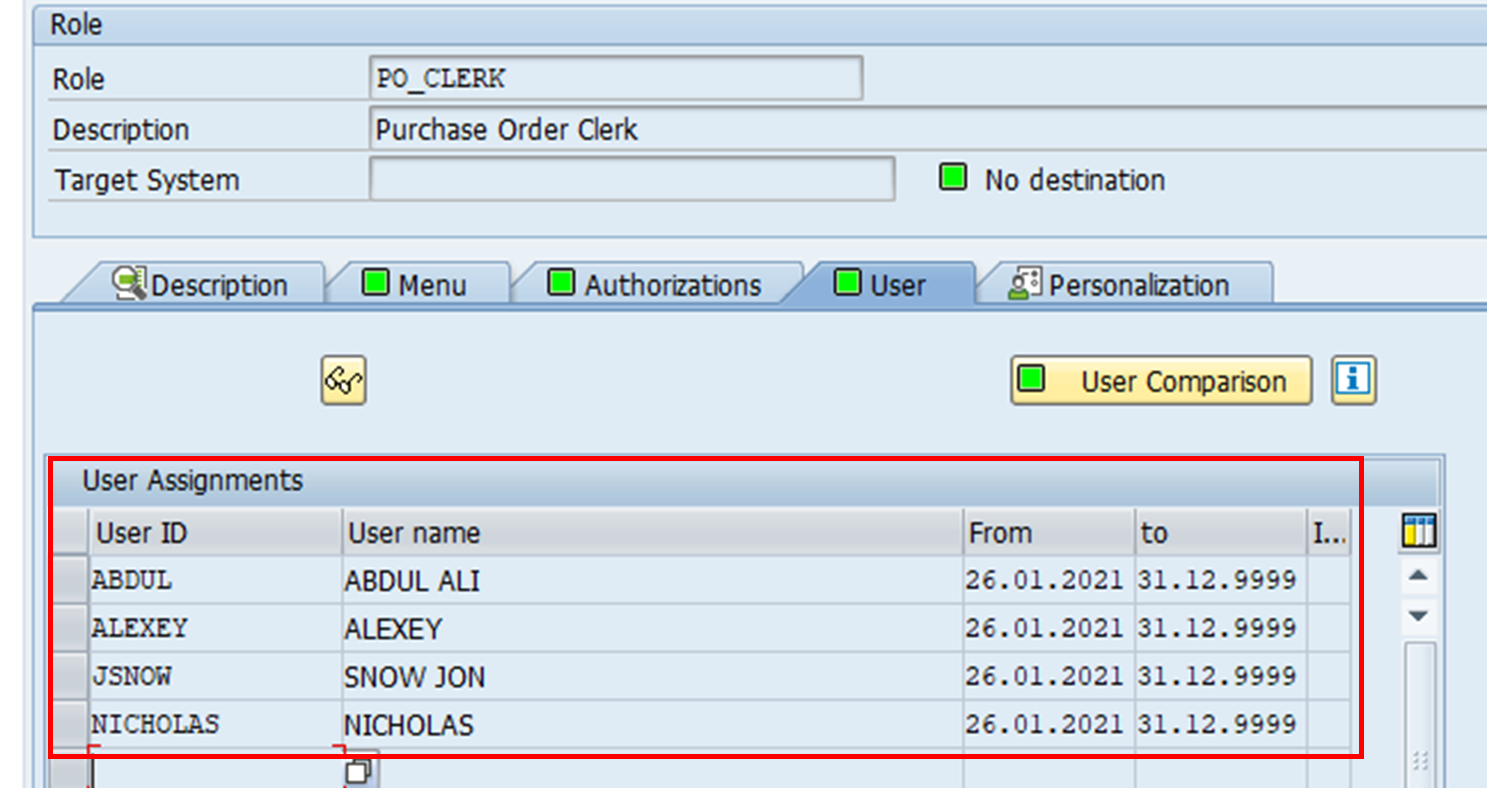
When we inspect user ALEXEY, we can see that the role assignment has been captured in his user profile too.

By using the automatic PFCG functionality, users are less likely to encounter an error message during authority check.
Composite role
In the example above, we created a single role. Multiple roles can be combined to form a composite role. A user can be assigned a single role directly or a composite role instead.
Similar to the creation of single roles, composite roles are also created in PFCG. Let’s say we want to create a composite role which contains two single roles:
Steps
1. On PFCG, a composite role is created.

2. The roles which make up the composite role are added. In this case, PURCHASING_CLERK is made up of two single roles. It is also possible to add a composite role into another composite role.
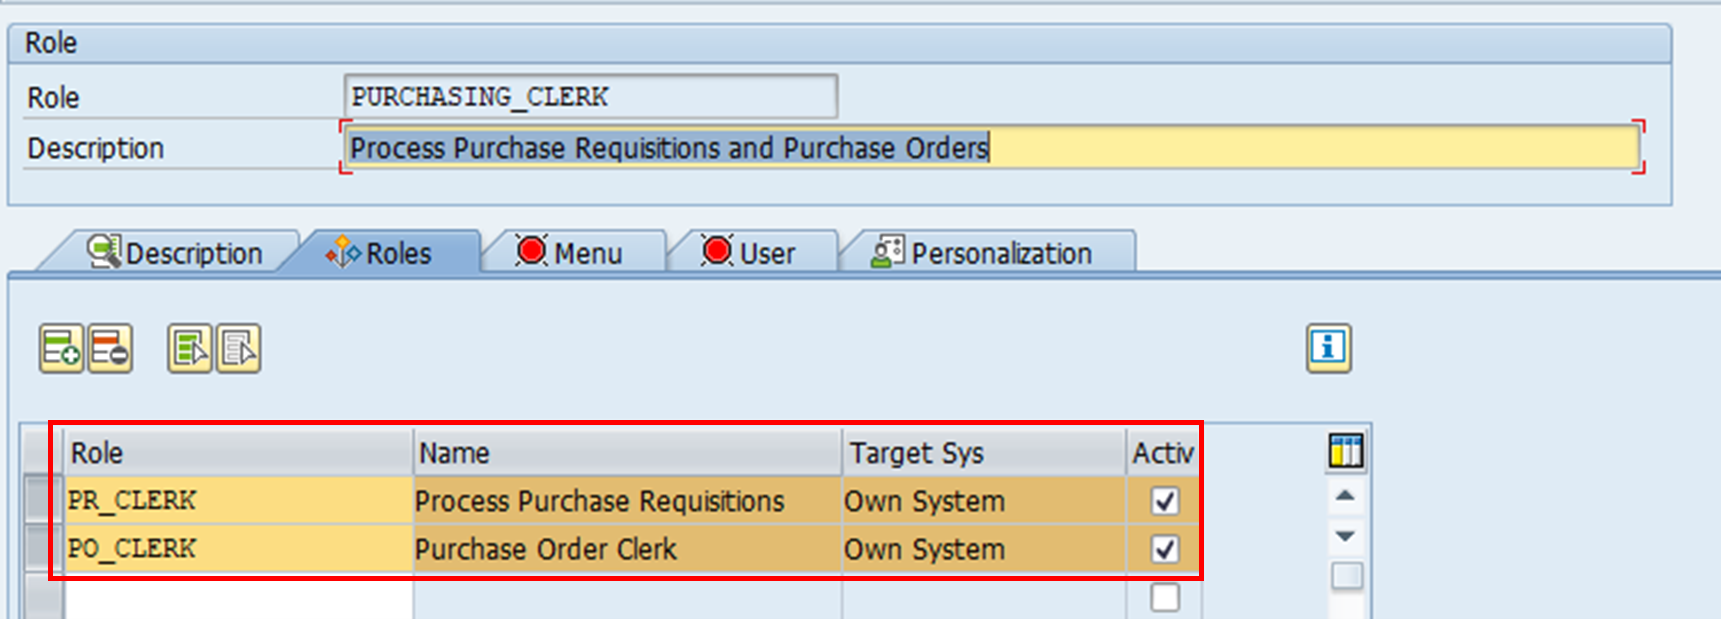
The menu displays for these two assigned roles are automatically adopted to the composite role. As a result, you can see the transactions ‘Create Purchase Order’ and ‘Create Purchase Requisition’ without having to specify the t-codes for them.

3. Next, the user IDs are added.

Resulting role assignments
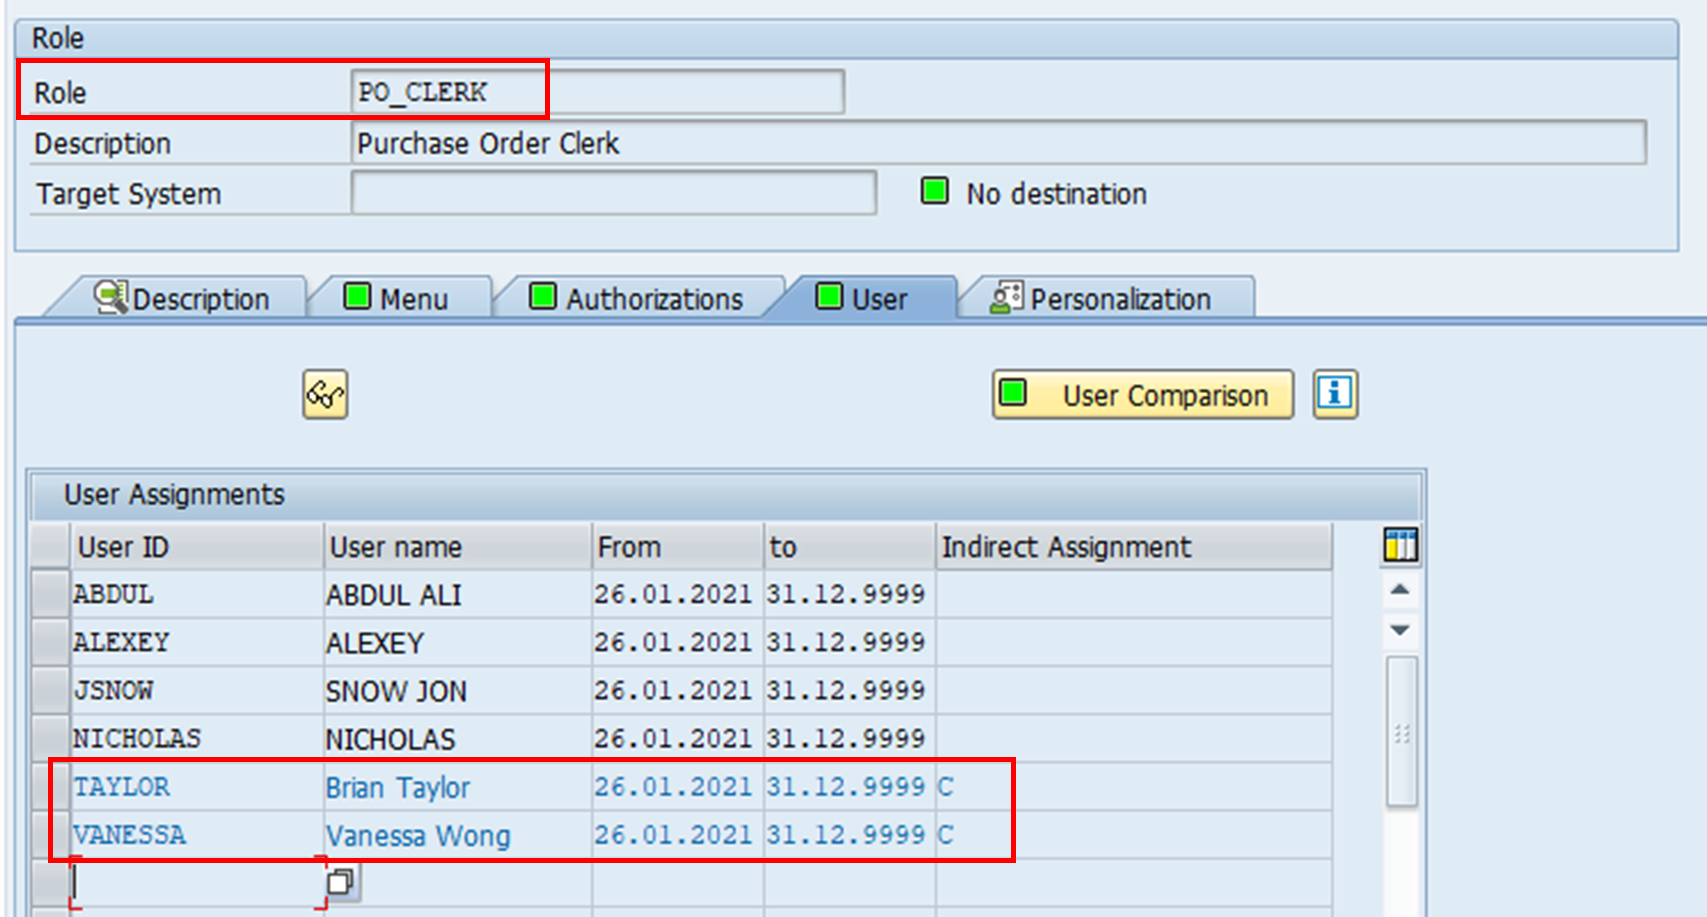
As a result of the user assignments, inquiring on the role PO_CLERK also shows two additional user IDs assigned. Note how theirs are indirect assignments through a composite role.
Conversely, when we look at the user VANESSA, we can see that the user has three roles assigned to her.

Creating master and derived roles
Master and derived roles have the same authorisations, with the exception of organisation authorisation field values. These are specified in order to allow transactions to be performed for respective organisational units.
The master role is first created without any specific organisation authorisation object fields defined. In practice, these fields can be given the value * (all authorisations) or ‘’ (dummy value). The derived roles inherit all the master role’s authorisation objects, with the exception that organisation authorisation field values have to be defined accordingly.
Using master and derived roles helps decrease administrative efforts in the building of the roles and reduces the risk of incorrect roles being built.
In this example, we will create master and derived roles for PO creation. Both master and derived roles will have the same authorisation objects as per the role PO_CLERK we have seen above, with the exception of the organisation authorisation field values.
Steps
1. The role PO_CLERK_MASTER is created as a single role. The building process of this role is exactly the same as the steps taken for PO_CLERK role above, up until the point of specifying authorisation objects. As you can see, the relevant t-code is also specified here, which results in a menu being shown for this role.

2. Under the Authorizations tab, select Expert Mode for Profile Generation.
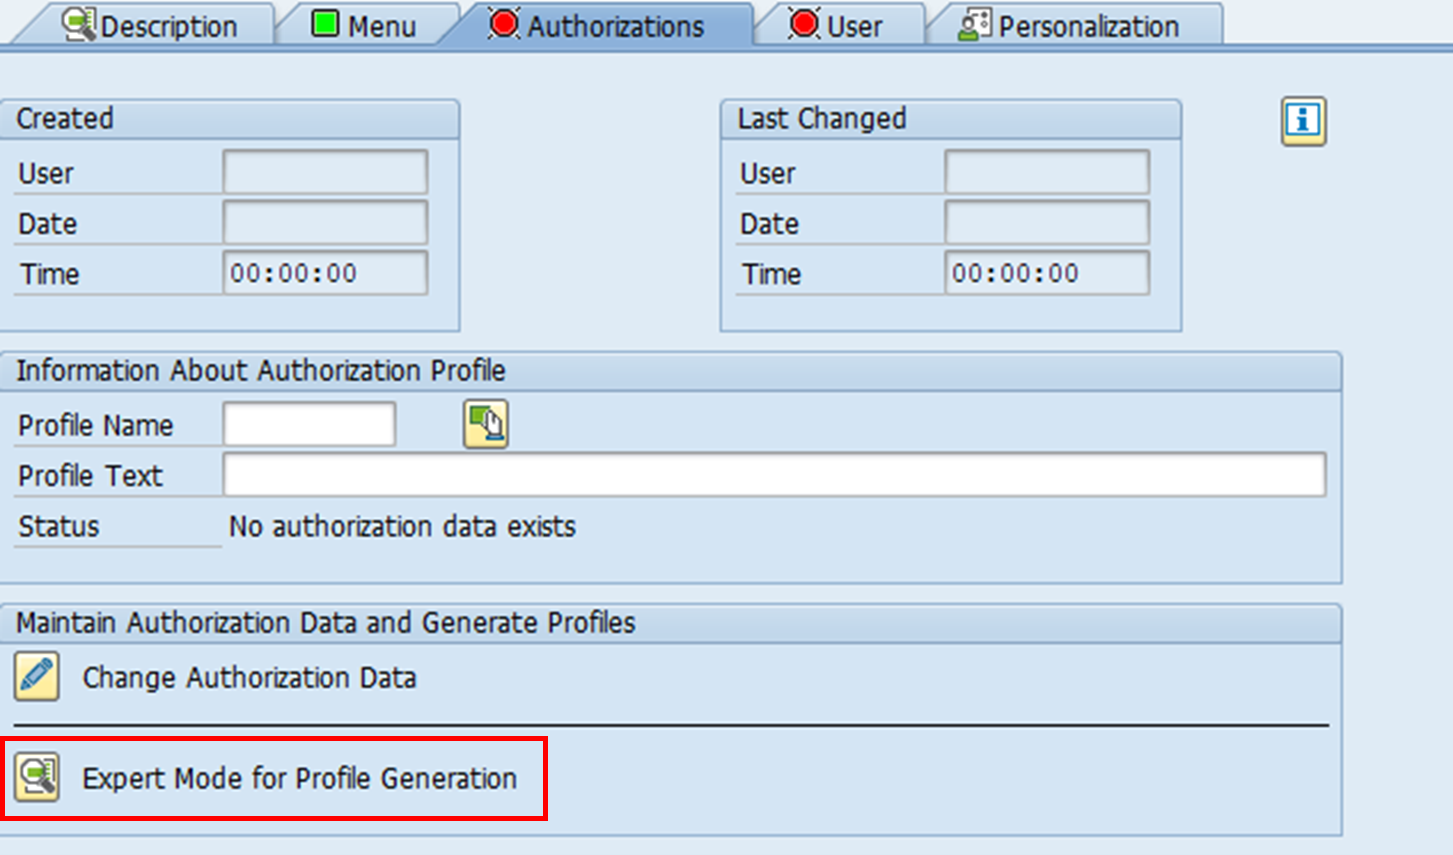
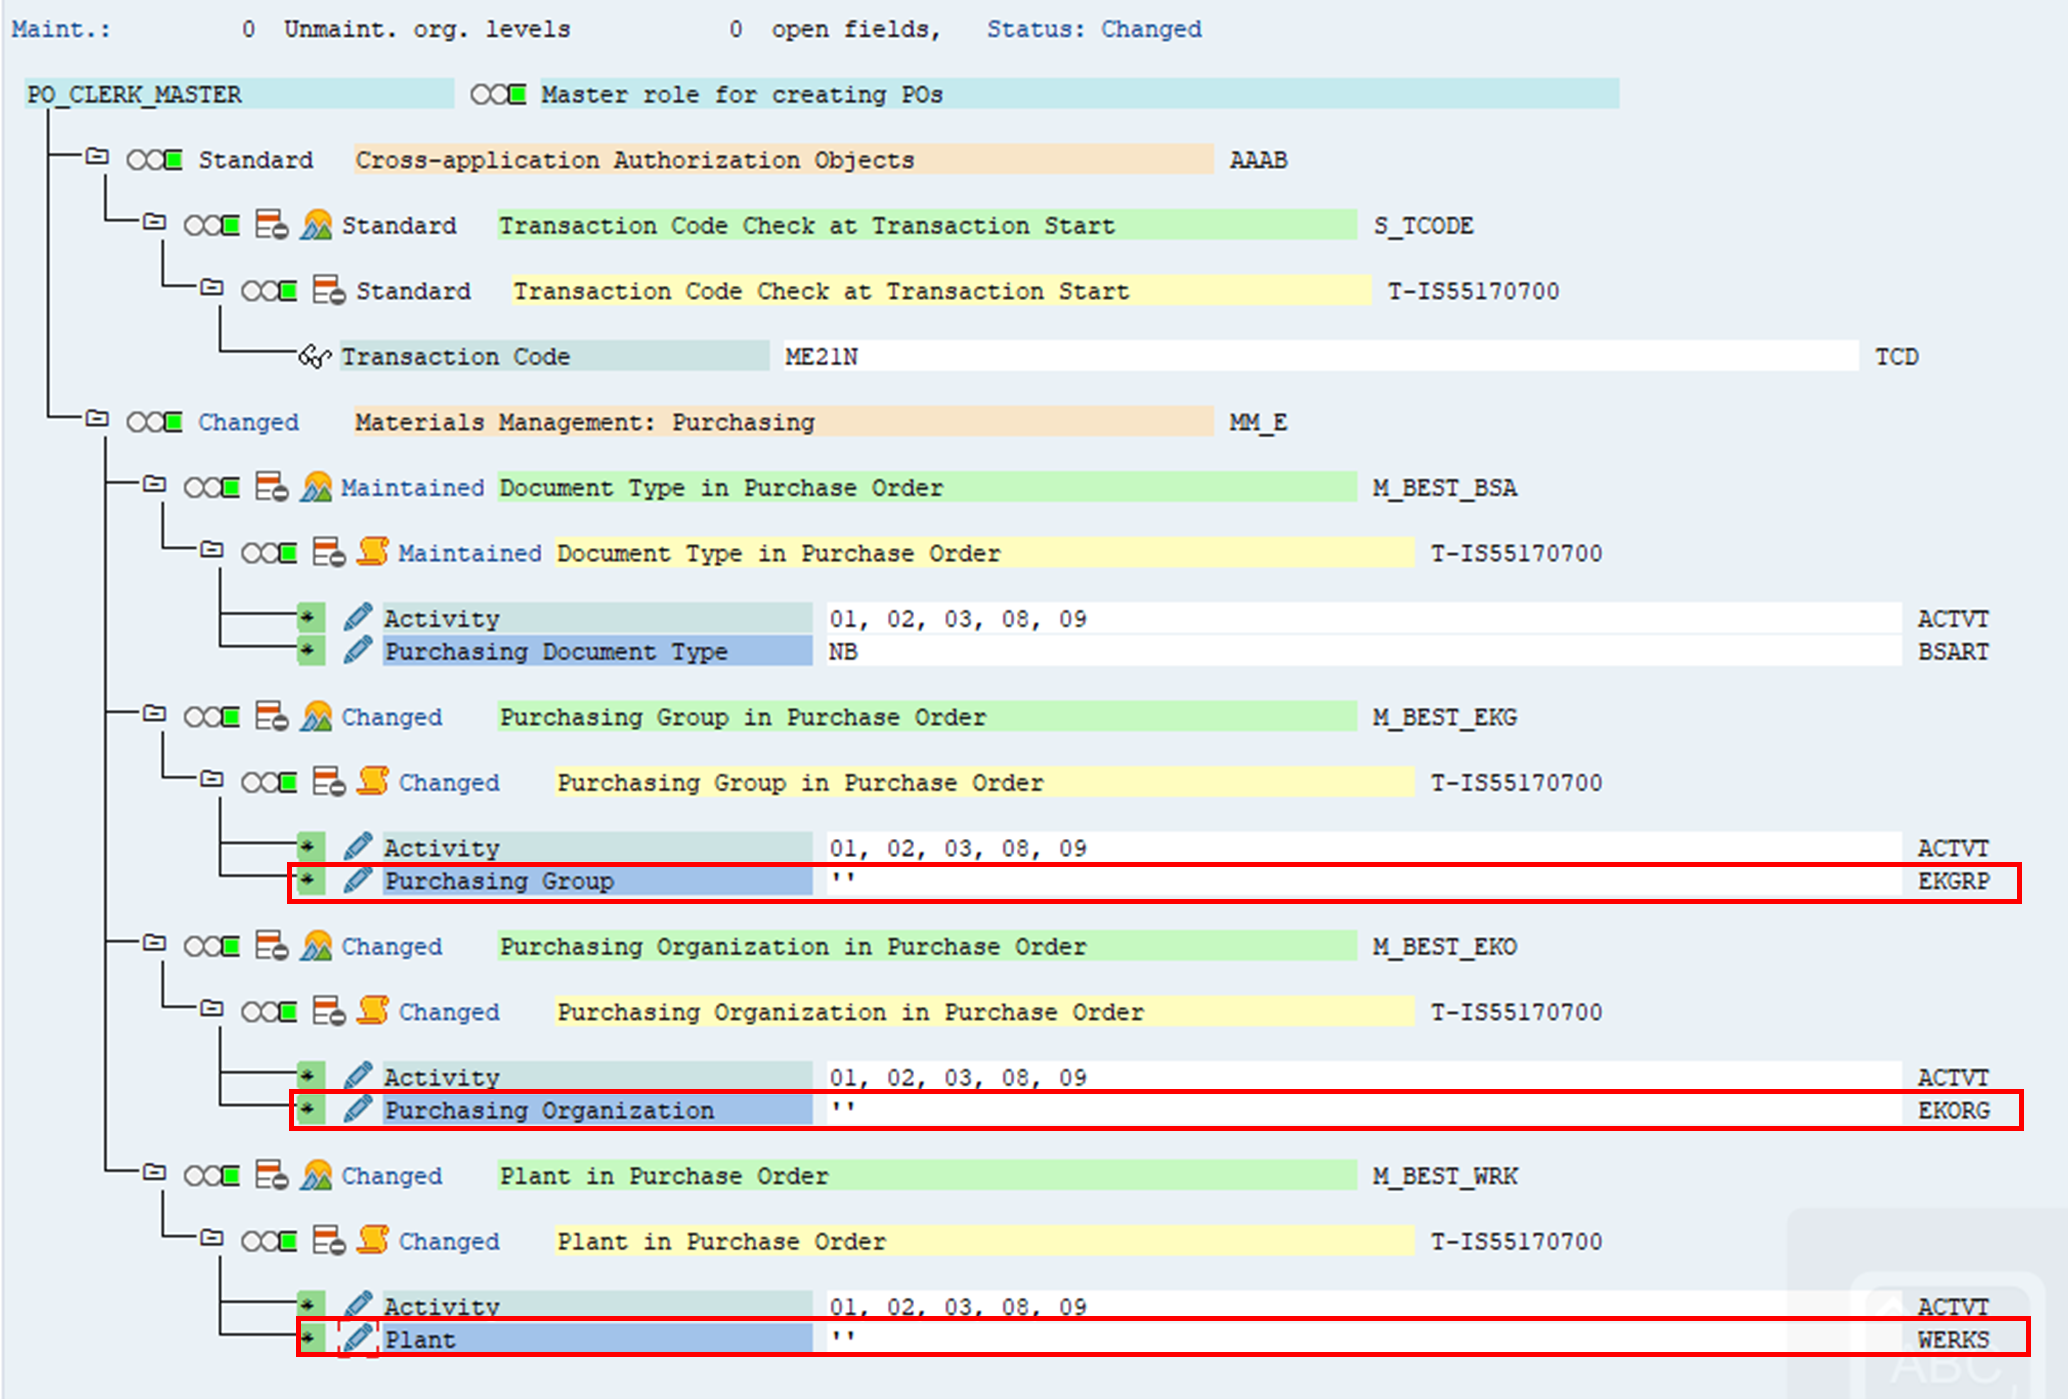
3. When specifying the authorisation field values, enter ‘’ or * in organisation value fields. This is a dummy value which ensures that the profile can be generated for this role.
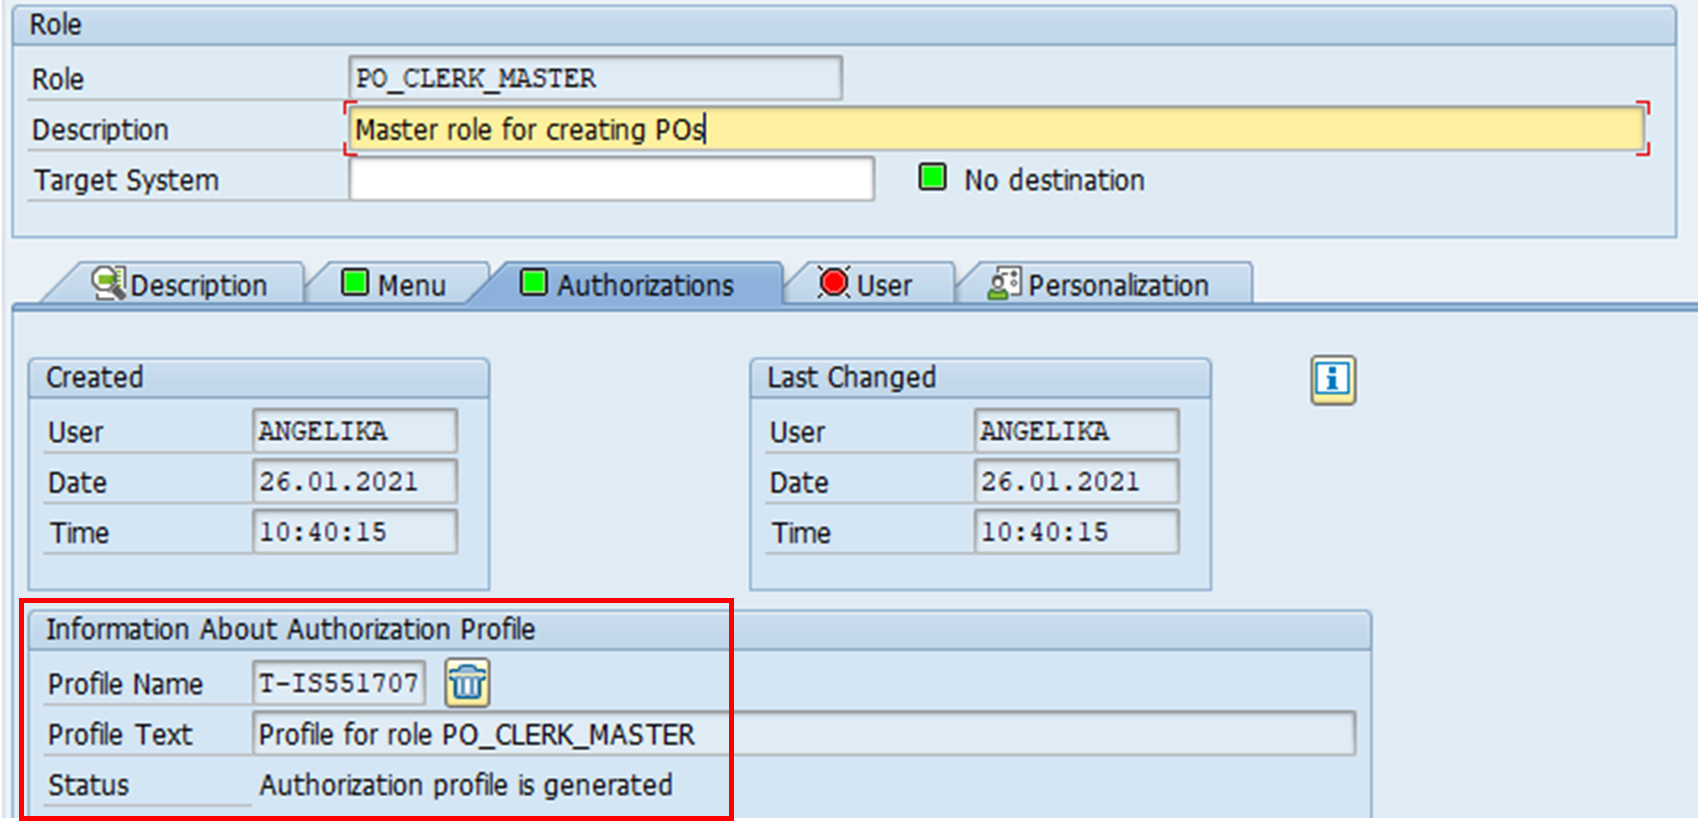
As we can see below, this is the profile for role PO_CLERK_MASTER. Once the profile has been generated, a derived role can be created.
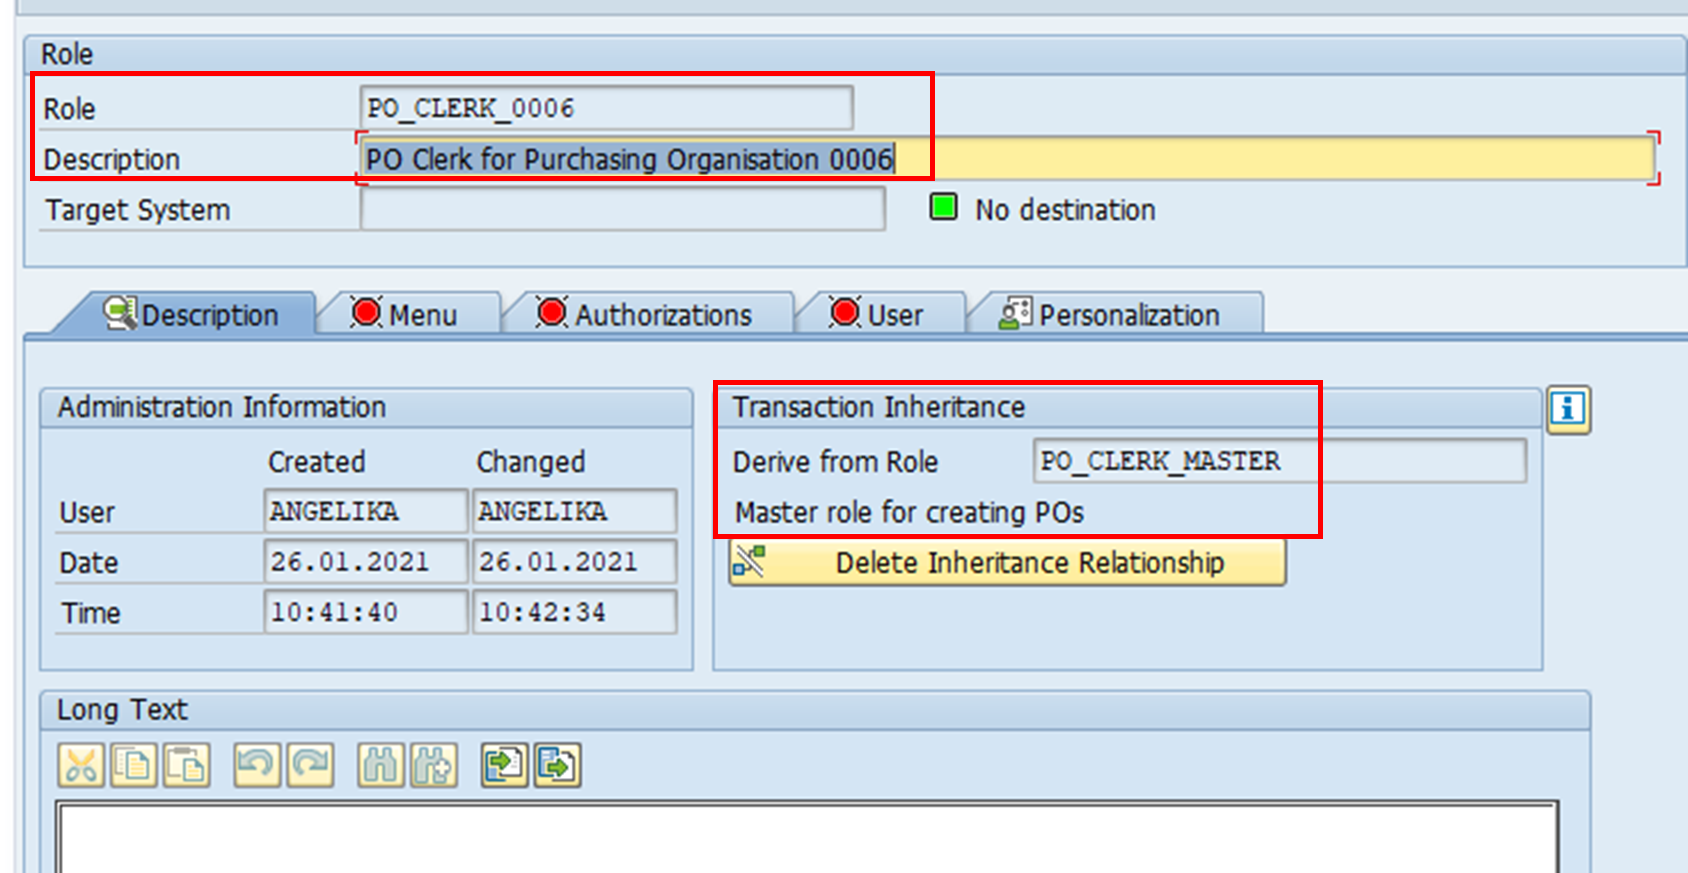
4. On PFCG, a single role for the specific derived role is created. In this case, we will create a derived role for purchasing organisation 0006. The master role is specified to ensure that the derived role inherits all the authorisation objects of the master role. As you can see, it is also possible to delete inheritance relationship (i.e. master-derived relationship).
The ‘Menu’ tab shows that the menu display from PO_CLERK_MASTER has also been inherited.

5. Authorisation values need to be specified for PO_CLERK_0006, as it will be different from that for the master role.

The screenshot below shows the authorisation field values for PO_CLERK_0006. As you can see, all authorisation organisational values have been completed as specified. Once the values have been defined, the profile can be generated.
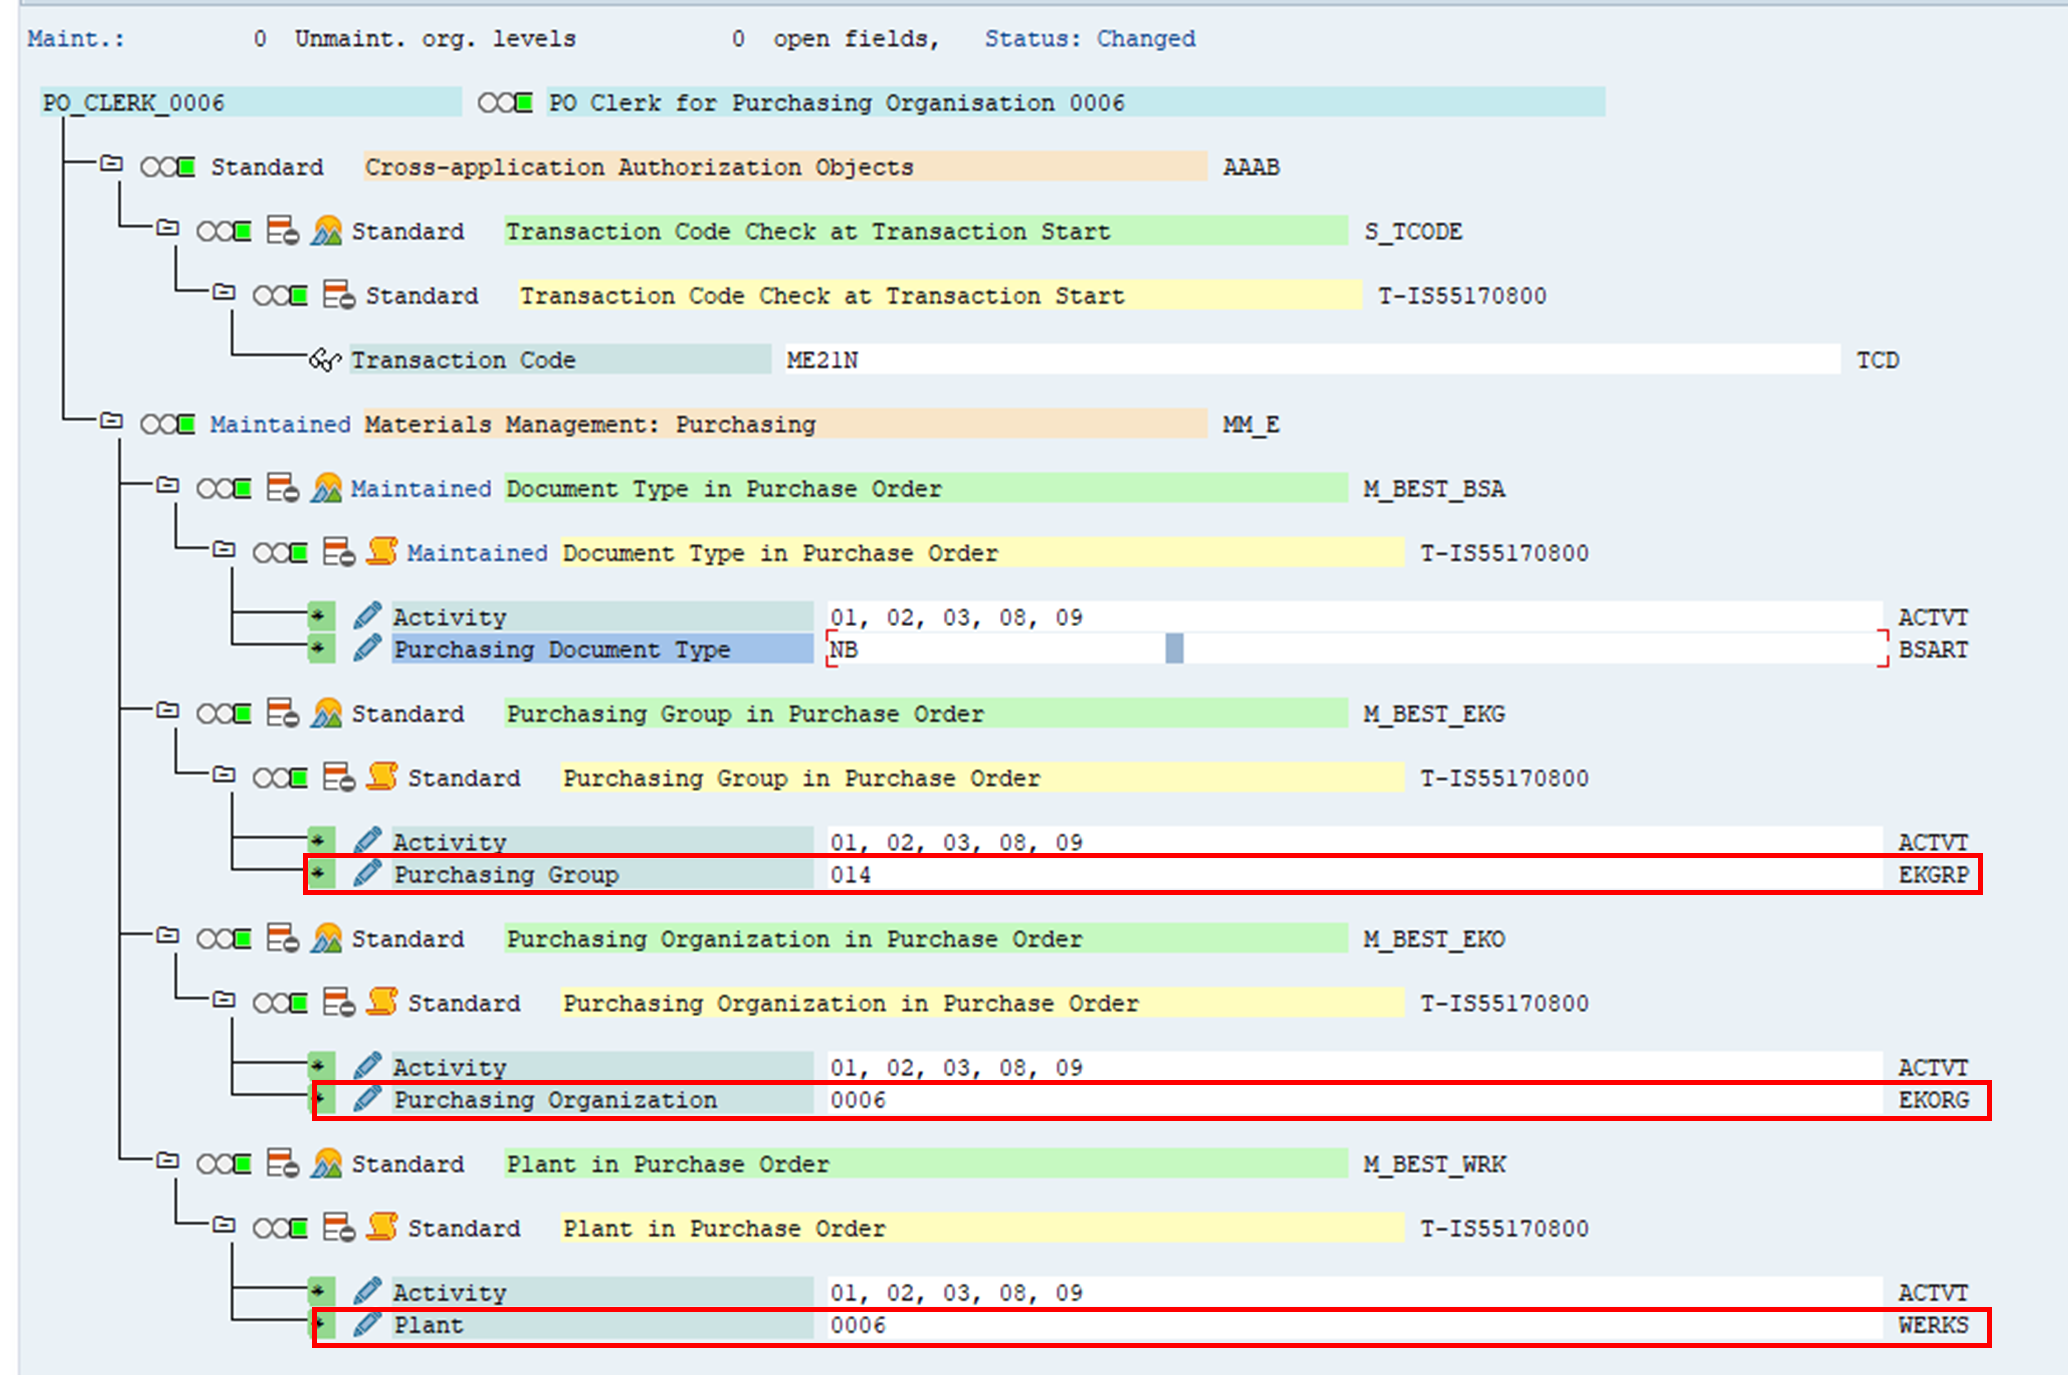
The screenshot shows the generated profile. It is different from the master role’s profile.
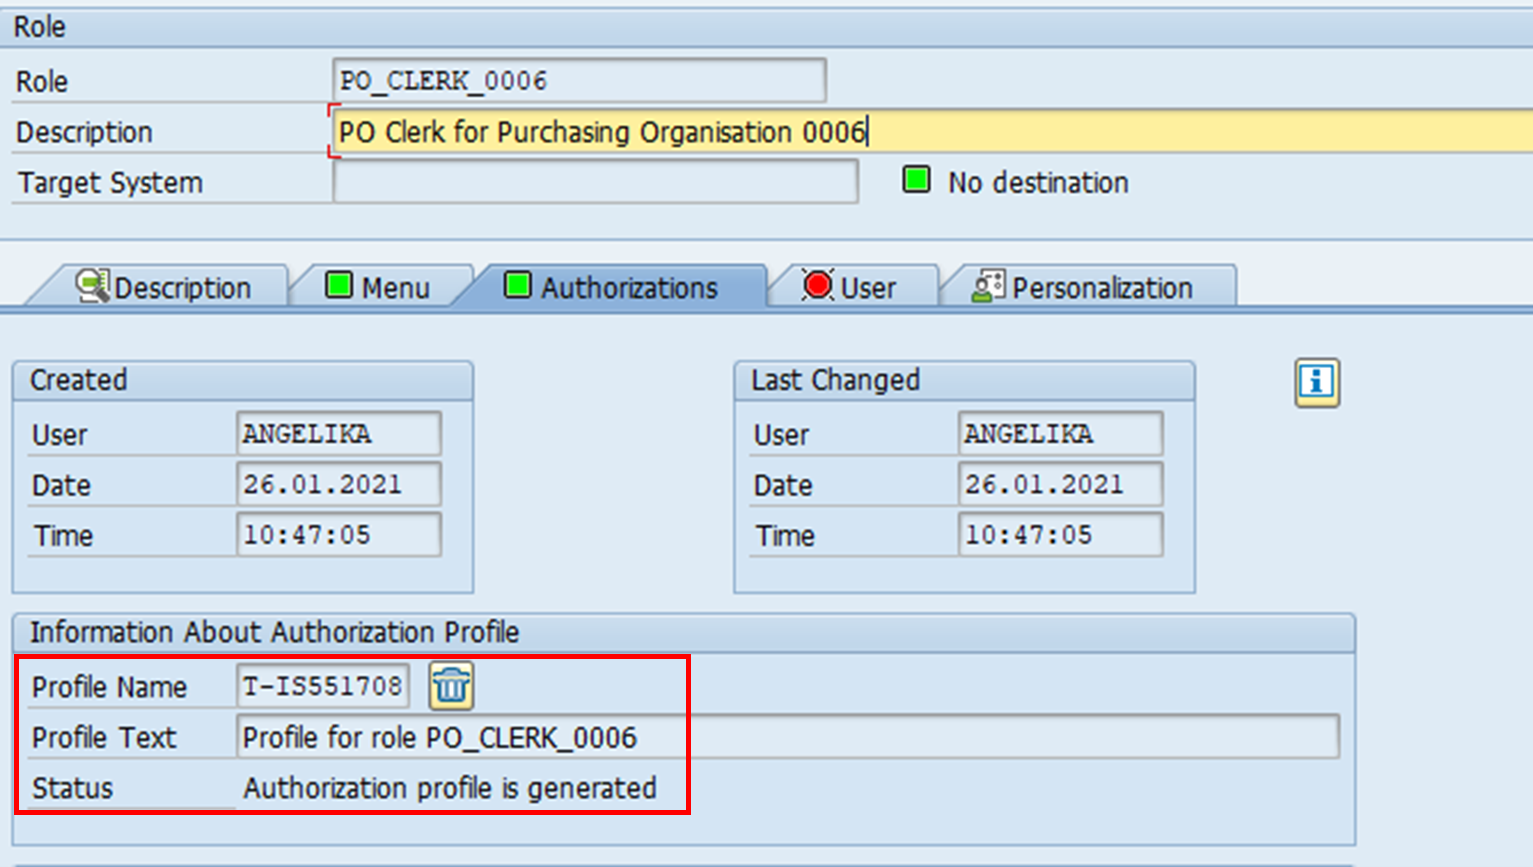
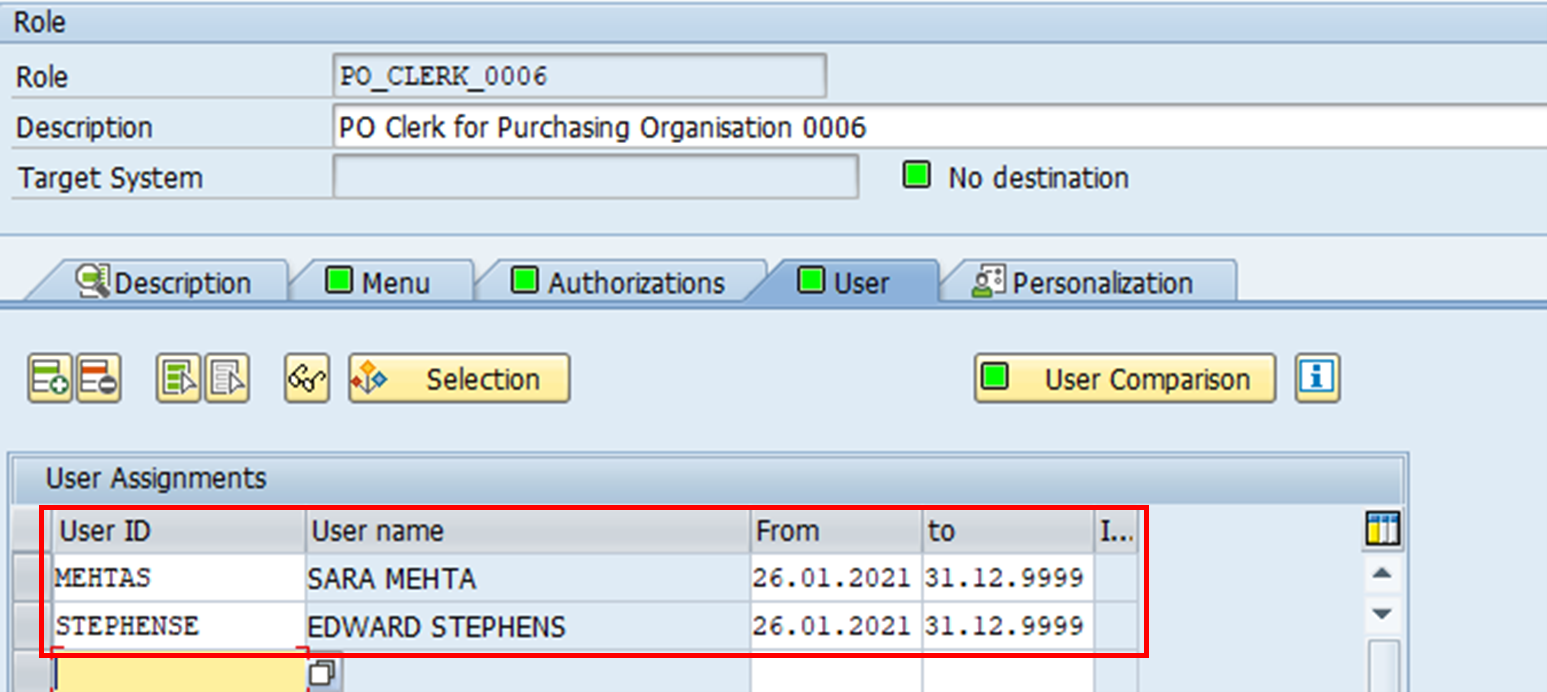
6. Once the profile has been generated, the derived role can be assigned to users.
Conclusion
Where possible, we recommend that you follow the SAP convention of using automatic PFCG functionality in your role-building. It greatly reduces administrative efforts and potential authority check errors, while helping roles to be built in a more systematic and organised manner.
There may be occurrences where this standard SAP way of working is not suitable, in which case the steps above may not apply. These occurrences are far and few in between, and would usually be resolved by using the enabler role concept.
With any approach, we recommend that you maintain detailed and consistent documentation of the roles you design and built. This goes back to the point we have mentioned in a separate blog post on role-building principles. Roles act as a communication medium between business and IT. It is crucial that they are accurately built and maintained, in order not to diminish its usefulness as this medium.
Go to Newsletter edition 02 here.
